- At ELO, we use a web database called Session Manager to manage every lecture of every course we record in a given semester. Session Manager allows us to keep track of who records what lecture on which days and shows how far along the course is in the recording or editing phases. It is also where we post the links so that they will be visible in Blackboard.
- Log into Session Manager at the following link: https://elo.engineering.iastate.edu/sessions/. Use your university netid and password to log in. If you are not able to log in, alert one of the Senior Producers or Matt, and then log in with the Instructor PC username/pass
 word on the large TV in the control room.
- When you log in, you will see a list of all the classes that are scheduled for that day. If the day is not correct, click the ‘Today’ button in the left panel. Notice that they are divided up into 6 major groups: Scheduled (white, not yet recorded), Recording (purple, recording now), Recorded (orange, recording finished, needs editing), Edited (yellow, editing complete, needs posting), Posted(green, posted, needs to be QA-ed), QA-ed (green, lecture complete). These are the Six Stages of Production: Scheduled, Recording, Recorded, Edited, Posted, QA-ed. A Lecture is not considered complete until it has progressed to the QA-ed stage and all links are posted into Session Manager.
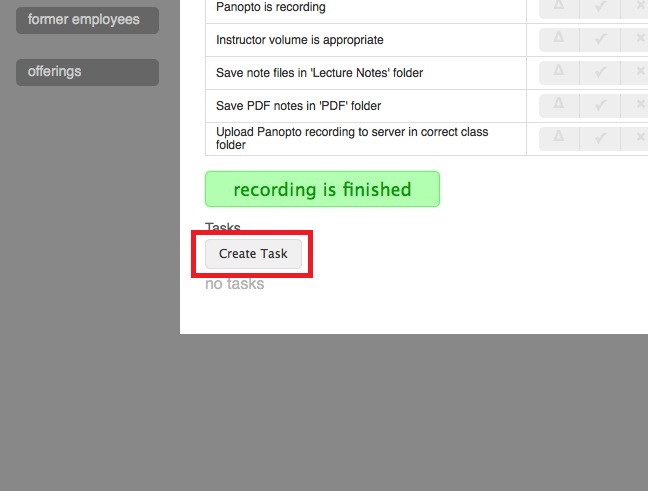
- Click on a lecture in the Recording stage. You will see a checklist of events that are necessary to move
 the lecture into the next stage. There are four states that each task can be in: InProgress (orange triangle), Complete (green check mark), Error (red x), Not Applicable (gray N/A). Note that clicking the Error state for any event will trigger a task for that event. Every stage will have a checklist of this type to progress it to the next stage. The checklists may vary by room, so PLEASE read and ensure that you have performed the step before marking it as complete.
- When in the checklist view, there are two more items of note. In the top right corner of the screen are three fields to enter links: one for WebEx recordings, Echo recordings, and Notes for each class. These are where the links must be posted for them to be accessible by students. Just beneath that, there
 is a place to add a comment for the class, then a list of all the events that previous producers have made while recording/editing/posting this class. The default view shows only the most recent events, but you can click show/hide at the top right corner of the list to show all events that have occurred and who completed them.
- Return to the ‘Today’ view by pressing the ‘Today’ button on the left panel of Session Manager.
 Notice that at the top of the page, there are links to view yesterday’s and tomorrow’s classes, followed by a number in red. The number in red gives a quick indication of how many classes are not yet complete for that day. When editing, please make sure that all classes from previous days of the week are complete or processing to ensure the classes are not forgotten.
- Other than the Six Stages of Production, classes have another possible stage – Cancelled. This stage should be used whenever class is not held because of an exam, the instructor is out of town, etc. Note that this affects the lecture numbers shown in Session Manager – if Lecture 09 is cancelled, then the next session becomes Lecture 09, and so on. Therefore, if the instructor is out of town but wants some previously recorded content to be posted, DO NOT CANCEL THE SESSION. This will keep the lecture numbers synchronized. To cancel a class, select the class session and select ‘Cancel this Session.’ It will then appear at the top of the ‘Today’ view as a Cancelled class. If the class has already been started in session manager, a senior producer will have to cancel it, so let them know right away.
- Session manager also contains a task feature that describes extra work that needs to be completed to complete a class (usually due to technical issues) and assigns the task to specific producers. You can view all current tasks by clicking on ‘All Tasks’ in the left panel. Tasks can be in one of three stages: Open (needing immediate attention), In Progress (being investigated or waiting on precessing overhead), and Resolved. You can view the list of tasks assigned to you by clicking ‘My Tasks’ in the left panel. Feel free to contribute to solving tasks if you can, even if they are not assigned to you. Keeping an eye on tasks and how some of the more common tasks are solved will help you become a more efficient producer.
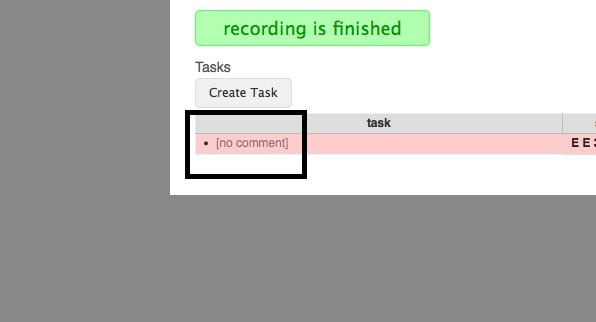
- Go back to the ‘Today’ view and click on any class session. Notice that there is always a button at the bottom of the checklist view to ‘Create Task.’ Click this button to create a task. A task will appear below the button in red. Click on the task ‘[no comment]’ to view it. First, add a comment to describe the nature of the problem and what needs to be done to resolve it (In this case, add the comment ‘Training task’). This first comment becomes the name of the task. Second, choose the owner of the task. The task is automatically assigned to you, so if it should be assigned to someone else, select their name from the drop down menu (leave yourself as the owner for now). Finally, set the status of the problem (now that you have seen how tasks work, set the status to ‘resolved’).